

How To Install Android Update With Twrp
In this guide, nosotros will evidence yous how to update TWRP Recovery on your Android device. When you enter the custom development scenario, the get-go thing that you demand to do is to unlock the device's bootloader. This volition then automatically open up the floodgates to the plethora of customizations. However, your device might need a helping paw from a custom recovery equally well. This is because your device'south stock recovery isn't capable enough or rather designed to work in this domain.
OEMs take baked in the stock recovery in their devices for the users to behave out some basic functionalities. These include performing a factory reset, installing ADB via Sideload, and a few other options. Notwithstanding, if y'all are entering custom development then these features of a stock recovery aren't enough. This is where a custom recovery like TWRP comes to the fore. Beholding a plethora of characteristic-set, information technology is a boon for tech enthusiasts.
While some of its functionalities could still exist carried out via fastboot commands [How to Flash Stock Firmware via Fastboot Commands], however, they are far and few in numbers and require way more than attempt than a custom recovery. Hence TWRP is the get-to method for all and justifiably so. Furthermore, the developers regularly release new builds of this recovery with bringing in improvements and overall stability. Hence information technology is always recommended to go along the recovery upwardly to date. And in this guide, we volition help y'all with but that. Here are all the required instructions to update TWRP Recovery on your Android device.
- Prepare Magisk Module Bootloop without TWRP Recovery
- How to Ready TWRP Error 20 GApps later flashing LineageOS
- Fix Mi Account Authority | Unbrick Xiaomi | EDL Fashion
- How to Fix Mistake: Cannot load recovery.img
What is TWRP Recovery and why you need to Update it?
The earlier times were solely dominated by the ClockWorkMod (CWM) Recovery. However, it lacked some advanced functionalities and wasn't a touch on-based recovery. You had to use the hardware keys to acquit out all the desired tasks. However, as presently as TWRP came into the moving picture, the shift was imminent. Not only did it came with many more than features but also had a touch interface. Soon it claimed up the ladders and became the go-to recovery, shifting CWM into oblivion.
With TeamWinRecoveryProject or TWRP as is popularly known, you lot become a plethora of feature sets. To brainstorm with, you could easily install IMG and ZIP files. This straightway translates to your ability to wink mods, custom ROMs, custom kernels, and fifty-fifty Magisk Installer for root. Likewise, TWRP also allows you to take a complete Nandroid backup, wipe diverse device partitions, or use advanced features such as Final Window or Fixing Recovery Bootloop.
Hence with such a long list of features, no doubt it has become the get-to option for many tech enthusiasts. Along the same lines, developers bring in a new version of this recovery subsequently a regular interval of time. The frequency of such updates is more in the unofficial TWRP every bit compared to the official ones. This is considering the official ones are already polished and all the features are fully checked before making information technology public on the official TWRP sites.
On the other manus, unofficial TWRP gets launched within few weeks of kernel source code beingness released by the OEMs. However, these are ordinarily the alpha and beta versions. The developers then become through the feedbacks of the users and patch the issues in the next build. And your function is simple, just to update the already installed TWRP Recovery on your device. And in this guide, we will help you with just that. Follow along for the detailed instructions.
How to Update TWRP on any Android Device
We take listed downwardly the entire instruction set in split sections for ease of understanding. As for the prerequisites, well it goes forth the obvious lines that your device'south bootloader needs to be unlocked and you should already have the TWRP installed. Do notation that Droidwin and its members wouldn't be held responsible in instance of a thermonuclear state of war, your alarm doesn't wake you upwardly, or if annihilation happens to your device by performing the beneath steps.
- How to Install OTA Updates in Rooted Android Device
- How to Permanently Install TWRP without TWRP ZIP File (only using TWRP.img file)
- Fix TWRP Error 7 (While Flashing Custom ROM via TWRP)
- Root Android Devices Without TWRP Recovery
Footstep one: Download The Latest TWRP
To begin with, download and install the latest TWRP Recovery for your device. The official builds could direct be downloaded from TWRP's site. On the other hand, if you lot are using an unofficial recovery, XDA Forums is the identify to find the latest version of the recovery.
STEP ii: Transfer TWRP to Device
In one case you have downloaded the TWRP Recovery, transfer it to whatsoever easily accessible location on your device.
STEP iii: Boot Android Device to TWRP Recovery
Now, it'south time to boot your device to the TWRP Recovery. There are three easy ways of doing so: either via hardware fundamental combinations, using ADB Commands, or from the Fastboot or Bootloader Menu [Check Out: How to Boot into Recovery (TWRP/Stock) from Fastboot Manner]. Given below are the steps to boot your device to TWRP via ADB commands. Follow along.
- Download and install Android SDK Platform Tools on your PC. This will requite you the necessary ADB and Fastboot binaries.
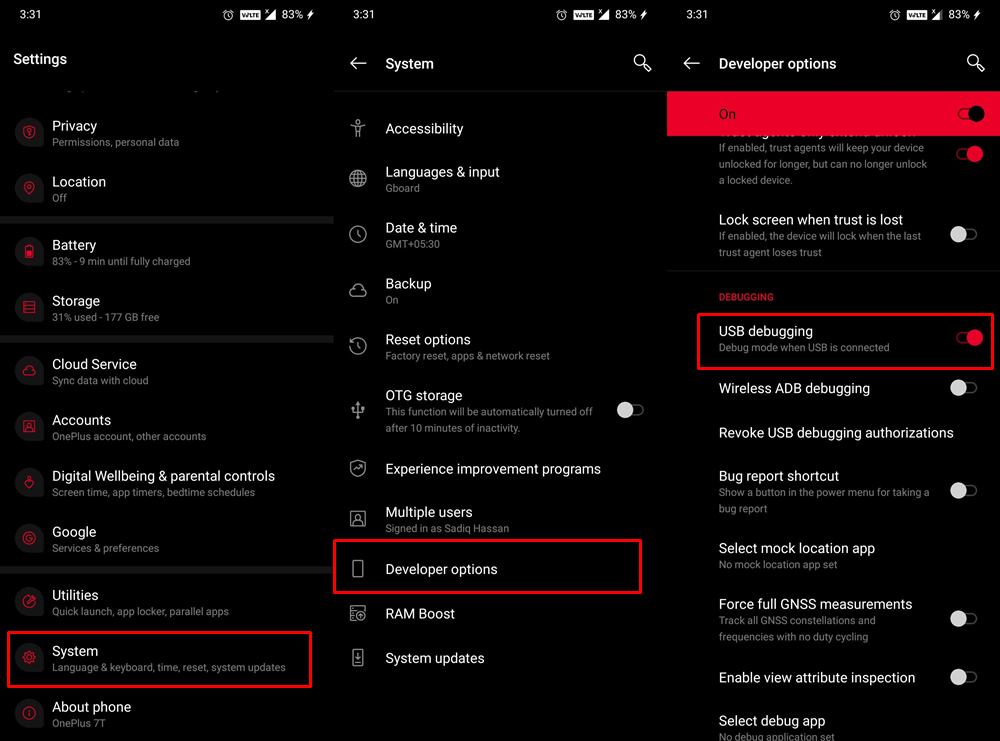
- So enable USB Debugging on your device. This will make your device recognizable past your PC in ADB style. So head over to Settings > About Phone > Tap on Build Number 7 times > Go back to Settings > Organisation > Advanced > Developer Options > Enable USB Debugging.
- Subsequently this, connect your device to the PC via USB cable. Brand certain USB Debugging is enabled.
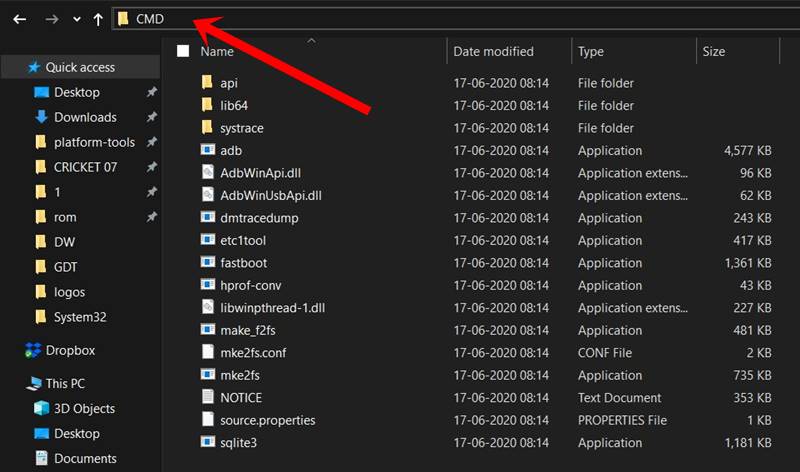
- And so head over to the platform-tools folder, type in CMD in the accost bar, and hit Enter. This volition launch the Control Prompt.
- Finally, type in the following command in the CMD window to boot your device to TWRP
adb reboot recovery

- That'due south it. Your device volition at present exist booted to TWRP, continue alee with the steps to update it on your Android device.
Stride 4: Update TWRP Recovery on Android from TWRP itself
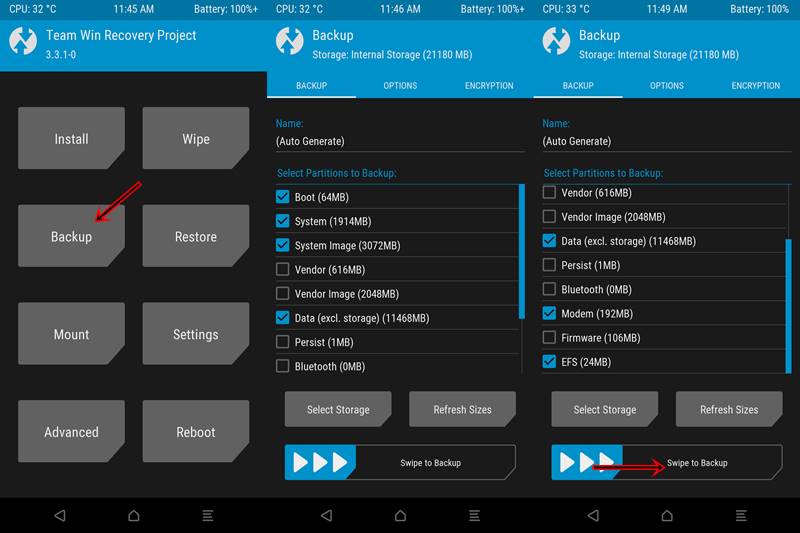
- Now that y'all are booted to TWRP, go to its Install section.
- So tap on the Install Image button situated at the lesser right.
- Select the twrp.img file that you had transferred to your device.

- And then chose the Install Recovery Ramdisk pick under the partition selection screen.
- Now, perform a correct swipe to wink this new TWRP onto your device.
- Once installed, go to Reboot and select Recovery. This is extremely important, you should reboot to TWRP once more and not to the Os at this stage.

- Once your device reboots to TWRP, you may at present reboot to the OS. For that, get to Reboot and tap System.

That's it. These were the steps to update TWRP Recovery on your Android device. If you have whatever queries, do allow us know in the comments section below. We will get back to you lot with a solution at the earliest.
- How to Fix FAILED (remote: unknown command) Error
- How to Run ADB Fastboot Commands directly on Android without Root
- Detailed Steps to Prepare adb is non recognized Error
- How to gear up ADB Device not plant [List of Devices Attached is blank]
About Chief Editor

Source: https://www.droidwin.com/update-twrp-recovery-android/
Posted by: romerochising.blogspot.com
0 Response to "How To Install Android Update With Twrp"
Post a Comment